Read Time: 6 Minutes Subscribe & Share
Focaccia Started As A Disposable Plate
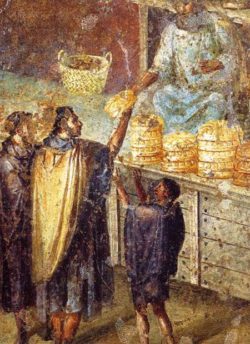 Bite into a wedge of focaccia and you are channeling the Ancient Greeks, Etruscans, and pilgrims traveling to or through Italy during the Middle Ages — not to mention a few random Renaissance artists. From panis focacius, (bread + hearth) the Latin term for dough flattened over a stone slab, covered in ashes, and baked in the hearth comes today’s soft, leavened focaccia.
Originally, it was unleavened, used as “disposable plates” for soldiers, sailors, and travelers who needed quick, nutritious, easily transportable and long-lasting provisions. The flat disk would serve as a dish, holding a variety of toppings, from salty fish to olives, herbs, and cheeses. Then, in early ecological fashion, it was eaten so there would be no waste. Ultimate recycling.
Liz DiGregorio and I think that summer is the perfect time for you to perfect your ancient bread skills. Then you’ll be ready to take focaccia with you on a picnic or pull it out of the freezer for a barbecue. Or make a quick sandwich, grab a book, and go out to your favorite park just to relax. It is, indeed, the best disposable plate.
There Is More Than One Focaccia
While many Mediterranean countries have their own focaccia-style breads, we are focusing on Italy. The Slow Food Dictionary to Italian 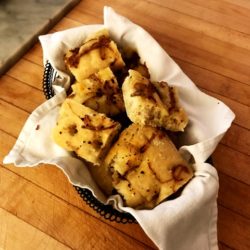 Regional Cooking lists 15 different versions of focacce (plural of focaccia). While they all share the basic common ingredients, the Italian imagination takes over, and each region puts its individual spin on the final product. The toppings vary from place to place. Sometimes the name changes. Some are savory. Some are sweet. Some are filled with cheese or vegetables. But all are delicious and reflect Italy’s regional pride.
Most focacce are made with a high-gluten (hard) flour, but some regions use flours common to their area, such as ceci-bean, corn, chestnut, cake flour, and flour into which mashed or riced potatoes are added. Some type of fat along with water helps bind the flour and produce the crisp crust. Lard was the original fat of choice, but now butter and good olive oil lead the way. The best quality olive oil is required to spread over the dough to fill those yummy indentations that give focaccia its classic look. Salt, to Italians, evokes centuries of salt wars, and bread with and without salt distinguishes one region from another. Focaccia contains salt in the dough and as the final touch after it is baked. Good table salt works for the dough, and coarse salt, like Maldon, sprinkled on top of the fresh-out-of-the-oven product is delizioso.
Travelers’ Aid
If traveling to Italy is in your future, you will find that focaccia is part of a large repertoire of flat breads. The thinnest is pizza, then schiacciata, and finally, the loftiest of the flats, focaccia. Here is a geographical glossary of focaccia-diversity to watch for when you are on your Italian vacation and staring at local menus — all of it sourced from Elena Kostiouskovitch’s diverting book, Why Italians Love To Talk About Food.
Liguria: Focaccia di Recco (cheese-filled focaccia); focaccia di Voltri (thin dough coated with corn flour and baked on a hot plate); and focaccia Genovese (also called fugassa), which most closely resembles the focaccia we experience in the US.
 Emilia Romagna: In Emilia, focacce called “chizze” are made, stuffed with slivers of parmesan and then fried in lard. In Bologna, it is called Crescentone. Bits of lard are added to the dough.
Tuscany: In Pistoia they make necci, focaccias of chestnut flour. Chestnut flour is also used in the focaccias of Garfagnana. 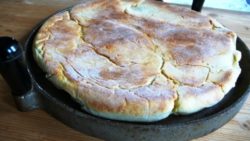
Umbria. The local focaccia is called “al testo”. It is cooked on a testo, or disk, which in the past was made from river gravel. Today, the testo is made of cast iron.
Lazio: In Gaeta, the focaccias are called “tielle” and are often dressed in the famous Gaeta olives, the color of red wine, small and aromatic
Sicily; Messina has focaccerie, focaccia shops; Catania schiacciate filled with cheese, anchovies, onions, and tomatoes and black olives; Syracuse and Ragusa call stuffed focaccia “scarce.”
Tips, Techniques, and Recipes
Looking through numerous cookbooks, online recipes and videos, one can easily become overwhelmed by focaccia abundance. We have included three different recipes for focaccia in this post. The first is from Flour bakery and cafe group in Boston, and it is a really good American take on focaccia. It will give you a poofier, lighter focaccia, perfect for splitting for our sandwiches. The second is a recipe from Cucina Italiana, which we have had to rework a bit, but it is chewy and coarser and a bit flatter. The third is from an Australian book on Italian cooking, which uses only all-purpose flour (the other two specify bread and all-purpose flour). This would be my go-t0 recipe if I had no access to really good quality bread flour.
If you are mixing by hand, Italian cooks feel strongly that the flour should be mixed into the liquid a cup at a time until the dough is too stiff to stir.
You must knead either with a dough hook or by hand until you can do the “windowpane check” with your dough.
If you use a blued/black steel baking sheet, the bottom crust will be darker than if you use an aluminum sheet. Both are very good as long as they are commercial quality. We don’t like stainless steel baking sheets, as the heat conduction is so poor.
All of them should be dusted heavily with semolina (semola) or cornmeal on the baking sheet.
You can use your baking stones or quarry tile, which will give a crisp bottom crust.
Nonstick baking sheets or really light weight ones will give you very disappointing results. The high heat required for focaccia (400F and higher)) will make lighter sheets buckle and also affect the traditional non-stick coatings.
A dough or bench scraper is your friend when manipulating a moist and sticky dough
You can freeze baked focaccia for up to one month. Wrap in a heavy-duty freezer bag. To thaw, let it sit in its wrapper at room temperature overnight. Or wrap it in foil straight from the freezer and pop it into a low oven (under 300F) until heated through. You can refrigerate a baked focaccia for only a day or two.
You can freeze unbaked focaccia dough, too, after the first rise.
Chilling the dough encourages it to settle down and behave. After the first full rise, punch down the dough, cover and refrigerate it overnight, let dough return to room temperature, then proceed with the shaping and final rise. You most likely will get a “holier” texture if you do this.
And always, always, make divots with your fingers after the shaped rise, as they hold the olive oil and the salt, plus create focaccia’s signature look. Below the recipe cards is a Cucina Italiana video on a little “secret” to improve the top crust.

- 1/2 tsp (4gr) caster or superfine sugar
- 2 tsp (5.7gr) dried yeast (instant yeast is faster)
- 3 cups (705ml) water (lukewarm if it is dried yeast)
- 2 lbs (907gr) all purpose flour
- 2 tsp (7.5gr) fine sea salt
- 3 tbs (45ml) olive oil
- cornmeal or semolina for dusting.
- Combine the sugar and yeast in 1/4 cup (59ml) water to activate it, which may take as long as 5 minutes. .
- Mix the flour and salt in a bowl, adding 2 tbs olive oil, yeast mixture and 3/4 of the remaining water.
- Mix and then add the rest of the water, a little at a time until you have a loose dough.
- Knead this either with a dough hook or by hand at least 8 minutes.
- It should be smooth and leave an impression when you an indentation made by a finger springs back immediately - or do the bread windowpane check.
- Oil a large bowl with remaining olive oil and roll the dough in the bowl to coat it.
- Cut a shallow cross in the dough with a sharp knife.
- Allow to rise (covered loosely in plastic or cloth in a warm draft-free place for 11/2 hours until dough is doubled in size,
- Alternatively, cover and leave in fridge for 8 hours- slower rise will yield a looser texture in the baked bread.
- Punch down the dough and divide into two portions (you can freeze one or store it in fridge for 4 hours but bring back to room temperature to form)
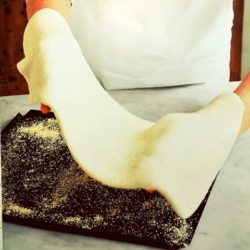
- Start by rolling the portion out into an 8x11 inch rectangle and then stretch or push out into a 10x15 inch rectangle.
- Lightly grease your baking sheet and dust it with the semolina or cornmeal.
- Allow it to rise inside a loose plastic bag or under a towel for around an hour or two.
- Your dough is now ready for the final recipe choice and be baked at 425F for 20-30 minutes.
- Suggestions from this book are: 1 cup of green olives pressed into the dough, then dosed with olive oil and sprinkled with salt and leaves from two rosemary sprigs
- OR 3 oz diced pancetta, pressed in the dough followed by 10 basil leaves, torn in half, pressed in, dosed with olive oil and topped with grated Parmigiano
- OR 1 cup Gorgonzola, mashed with 1-3 tbs mascarpone, gently spread across with 10 sage leaves, torn in half and 2 tbs Italian pine nuts scattered on top..
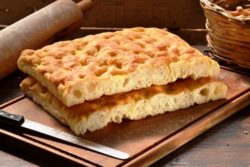

- 250 gr (2 cups) all purpose flour (00 if possible)
- 250 gr (1.97cups) high gluten bread flour (Caputo Rinforzata is a great one)
- 7 gr Instant Yeast or 15 gr fresh yeast
- 300 ml(1 1/4cups)water - you may need a bit more
- 45ml (3 tbs) olive oil or melted lard
- 10gr (2 tsp) sea salt
- By hand mix the two flours, yeast or use a dough hook in a mixer
- Add the water,olive oil (or melted lard) and the salt.
- Mix with a wood spoon, not with your hands.and allow to rest 10 minutes
- If using a dough hook in a mixer,just mix it until you get a shaggy dough.
- Then knead until you get a smooth supple dough.
- You can use the windowpane check before allowing it rise.
- Allow to rise in a greased bowl, covered until double in bulk.
- Once it has risen, spread it with your hands across a baking sheet that has been dusted with semolina
- You should have a rectangle at least 10x15 inches or a bit larger
- Let it rise for another 20 minutes before making the indentations.
- Make a mixture of 3 tbs (45ml) olive oil and 1 tbs (15ml) water and dose the focaccia with a sprinkling of coarse sea salt along with the oil and water.
- Put into a preheated oven at 400F for about 30 minutes.
- There is nothing better than serving any focaccia right out of the oven, or warmed up in foil on the grill. You can use a higher ratio of water to oil for final brine mixture that is used to top the dough after you make the indentations.
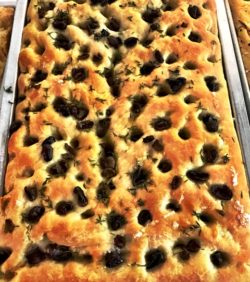

- 1 3/4 cup (420gr) water at body temperature
- 1tsp (3.5gr) dry yeast
- 3 1/2 cups (420gr) unbleached all purpose flour
- 1 1/4 cups (190gr) unbleached bread flour
- 1 tbs (18gr) sea salt
- 2 tbs (50.4gr) sugar
- 3/4 cup (150gr) olive oil
- handful of cornmeal for baking sheet
- 2 tbs (3.5gr) roughly chopped fresh rosemary
- In a bowl of a stand mixer, fitted with a dough hook, combine water and yeast and allow it to dissolve and activate - less than a minute.
- Dump both flours, 1 tsp salt, and all the sugar onto the water and turn mixer onto lowest speed.
- Mix dough on low for 30 seconds to keep flour from flying out of the bowl (bane of KitchenAid design)
- When dough is shaggy looking, add 1/2 cup (100gr) olive oil, aiming at side of bowl.
- Knead for 5 minutes in mixer until dough is smooth and supple.
- Hand kneading will take 8 minutes.
- Lightly oil a large bowl and transfer the dough, turning it so that the entire surface gets slicked by the oil.
- Cover with plastic or cloth and allow to rise in a draft-free place
- In about 2 to 3 hours, the dough should have doubled in bulk.
- Flour your hands and work the dough out of the bowl onto counter.
- Stretch it into a 10x15 inch rectangle (25x38cm) .
- Place on a cornmeal-dusted baking sheet and sprinkle flour on top of the dough.
- Cover loosely with plastic or cloth and allow to rise until it is puffy and pillowy.
- Preheat the oven to 425F and have a rack in the center.
- Remove plastic, dimple the dough with your fingers.
- Sprinkle the rosemary across the surface and spoon the 1/4 cup (50gr) EVOO and the remaining salt. (I used coarse sea salt and did more than she requires)
- Bake for 35 minutes or until golden brown
- Allow to cool before slicing.
- Focaccia will keep in closed paper bag for no more than 3 days or tightly wrapped in two layers of plastic wrap in freezer for 2 weeks.
- Allow to thaw to room temperature and refresh in 300F for 5 minutes oven or if frozen, it will take about 15 minutes.
- Variations are plenty but one would be 1 cup (140gr) chopped assorted pitted olives strewn along with the rosemary.

Kitchen Detail shares under the radar recipes, explores the art of cooking, the stories behind food, and the tools that bring it all together, while uncovering the social, political, and environmental truths that shape our culinary world.


Comments are closed here.
Follow this link to create a Kitchen Detail account so that you can leave comments!